Planning Your Pump Track
Building a pump track in your backyard is an exciting project that can turn your outdoor space into a playground for all ages. Whether you’re a seasoned rider or just looking for a fun way to stay active, having a pump track at home will definitely up your game. But before you grab your shovel and start digging, let’s dive into some essential planning steps.
Choosing the Right Location
The first step is to find the perfect spot. You’ll want an area that is flat and has good drainage. The last thing you want is a mud pit after a rainstorm. Look for a location that is somewhat away from your house, as the noise and excitement might get a bit loud! Keep in mind the size of the track you want; a small, basic design will require less space than an elaborate one.
- Flat Surface: Aim for a naturally flat area to minimize earth-moving tasks.
- Drainage: Avoid low spots to prevent water accumulation.
- Safety: Ensure there is enough space around the track to avoid accidents.
Understanding Pump Track Design
Pump tracks consist of a series of bumps and turns designed to pump the bike up to speed without pedaling. The layout can vary greatly depending on your skill level and the kind of ride you want. Here are a few popular designs:
- Beginner Track: Simple and smooth with gentle rollers.
- Intermediate Track: More challenging with sharper turns and larger bumps.
- Advanced Track: Features complex shapes and larger jumps for experienced riders.
Consider sketching out your design on paper or using online tools. Visualizing your track will help you understand how the flows interact while giving you room to play with ideas before any dirt is moved.
Gathering Materials and Tools
Now that you have your design, it’s time to gather everything you need. Building a pump track can be a DIY endeavor, and lucky for you, the materials are straightforward and often inexpensive. Here’s a list to help you get started:
- Dirt: The main ingredient for your track. Look for clay-based soil as it packs well.
- Shovels: You’ll want a couple of varieties—both flat and pointed.
- Rakes: These will help you shape the surface smoothly.
- Wood or Logs: For edging or to create borders to hold the dirt in place.
- Water Source: A hose or a sprinkler will help you moisten the dirt for packing.
Engaging Friends or Family
Building this track can be a lot of work. Don’t hesitate to rope in some friends or family to help. You’ve got to have some fun with it, right? Plus, this could be a great way to bond and enjoy each other’s company in the fresh air. Just make sure everyone is on board—having a crew that doesn’t mind a little sweat makes all the difference.
Building the Base
Clearing the Area
With your design sketched and materials handy, it’s time to clear your designated area. Remove any rocks, sticks, or debris that might get in the way. This is like preparing a blank canvas, and trust me, your shovel deserves to see some action. A clean space makes for an easier build and helps avoid any nasty surprises later.
Laying the Foundation
Next, you’ll start packing the dirt. Begin by creating a small roller or mound as your starting point. Moisten the dirt slightly—this helps it pack better and become more manageable. Use the shovel to shape the mound, then compact it down. Think of this as making a nature-inspired version of a cake; you want layers, but you also want it to be solid!
Building the Features
Once your base is ready, start shaping individual features like rollers and berms. A good rule of thumb is to make rollers about 3 to 5 feet wide at the base and taper them nicely to a peak. This gives the tracks the characteristic ‘pump’ feel. For turns, think about the bank; higher is usually better. It allows for tighter turning without losing speed.
- Rollers: Gentle hills that let you gain speed without pedaling.
- Berms: Banked turns that slingshot you through corners.
Finishing Touches
Smoothing and Packing
At this stage, it’s crucial to go over each feature again, smoothing out any imperfections. Use your rake for this. After raking, take a little time to pack each section down thoroughly. A well-packed track will hold up better and provide a more enjoyable ride. You can use water if the dirt is too dry to pack well.
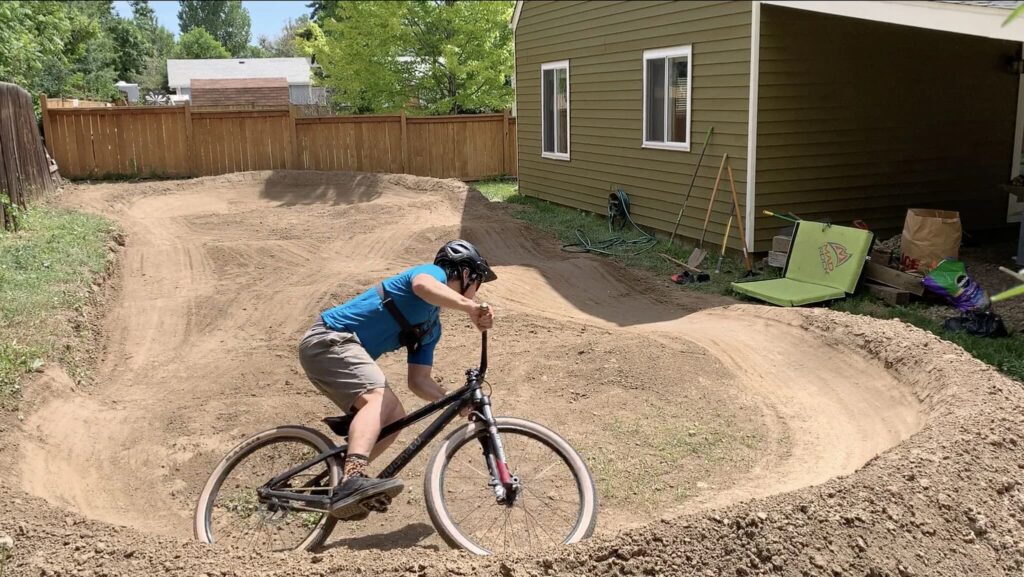
Testing Your Pump Track
With everything shaped and packed, it’s time for the moment of truth: testing the track! Grab your bike and take it for a spin. You might find some areas that need minor tweaks or adjustments. Don’t worry; this is completely normal. Your experience riding will guide you to the necessary changes. Remember to invite friends to test it out too; their reactions might just give you the best feedback!
Maintaining Your Pump Track
Once your pump track is finished, you’ll want to keep it in good shape. Regular maintenance helps ensure a consistent riding experience. Here’s what to keep in mind:
- Inspect Regularly: Check for any erosion or damage after heavy rains or high use.
- Pack Loose Dirt: Re-pack any areas that have become loose or spread out.
- Trim Vegetation: Keep surrounding grass and weeds in check to maintain clean lines.
Seasonal Checks
As seasons change, the weather can affect your track. Snow and freeze-thaw cycles can cause damage, so try to keep an eye out, especially in winter. If your area floods or experiences heavy rain, a quick inspection afterward will help you identify any major issues before they become a headache.
Enjoying Your Pump Track
Congratulations! You’ve built your very own pump track. Whether you ride solo or invite friends, your backyard is now the go-to spot for fun and fitness. Knowing that you created this from scratch adds a little extra joy to every ride. Plus, you’ll probably find that your skills improve as you practice.
In conclusion, building a pump track is an adventure in itself. From planning to the final touches, every step has its moments of fun and challenge. Putting your creative spin on the design allows you to craft something unique that caters to your style and skill level. So gear up, get out there, and enjoy that track you’ve worked hard on. Happy riding!